
September 12, 2026
Clock Animations GIF: How to Design, Export, and Optimize
Learn how to create clock animations GIF that loop smoothly, load fast, and stay accessible. Covers tools, frame rates, file size, and export tips.
You render a clock animation GIF at 24 fps, drop it into Slack, and immediately spot the problem. The second hand stutters when the loop restarts, while the file has grown far beyond what the design needs. The artwork may be simple, but a clock exposes every weakness in timing, compositing, and export settings.
A reliable workflow treats the asset as motion design first and file compression second. You need an invisible loop seam, controlled hand movement, a restrained palette, and a safer approach to autoplay motion. The following process works without specialty plugins or paid tooling, and a well-made clock GIF under 300 KB at roughly 15 to 20 fps is a practical target for many simple designs.
Table of Contents
- Why Clock Animation GIFs Are Trickier Than They Look
- Choosing the Right Tool for Your Skill Level
- Designing the Hand Movement and Loop Seam
- Export Settings That Keep File Size Honest
- Finding the Sweet Spot Between Frame Rate and Size
- Accessibility and Motion Safety Essentials
- Quick Checklist and Smart Next Steps
Why Clock Animation GIFs Are Trickier Than They Look
A generic animated illustration can hide a slightly awkward transition inside a busy scene. A clock can’t. The dial stays still, the hands have a clear geometric path, and viewers instinctively understand how the movement should behave. That makes even a small timing error obvious.
Three failure modes appear repeatedly:
- The loop seam: The final frame doesn’t match the first, so the second hand jumps, pauses, or reverses direction when playback restarts.
- High-frequency flicker: A sweeping second hand crossing tick marks creates rapid contrast changes, especially when the dial uses thin, high-contrast lines.
- The frame-count tax: GIF stores animation as a sequence of frames and lacks modern inter-frame compression. More frames usually means more image data, even when the design itself is uncomplicated. GIF frame-rate guidance explains why raising FPS can increase file size almost linearly.
The format remains useful because it has been around for decades. CompuServe released GIF on June 15, 1987, giving it a long compatibility history across browsers, apps, and content systems, as documented in this history of GIF meme culture. W3Techs reported GIF usage on 13.5% of websites in 2026, and an earlier web-format study found that GIFs represented 54.7% of images on the web, with 89.6% smaller than 10 KB. Those figures come from W3Techs’ GIF technology report, and they help explain why clients still request the format.
Practical rule: Build the clock so the first and last visible states are intentionally related. Don’t expect the encoder to repair a bad transition.
If you need broader context on how short-form motion is used online, the short-form video GIF meanings guide is a useful reference. For the clock itself, start with timing logic, not export compression. A smaller file with a visible jump still feels unfinished.
Choosing the Right Tool for Your Skill Level
The right tool depends less on the clock and more on how you already work. A motion designer who lives in After Effects will waste time rebuilding the setup in a slide tool. An illustrator may get a better result from Procreate than from a technical vector workflow.
After Effects gives professionals the most control. You can animate hand rotations, use a wiggle expression carefully for subtle irregularity, and apply time remapping to solve a loop seam. Export usually passes through Adobe Media Encoder, which adds a separate review point but provides a familiar production pipeline.
Keynote is an underrated option for a static-design clock. Build the dial on duplicated slides, move the second hand between slides, and use Magic Move to create a surprisingly clean sweep. It won’t offer the same timing control as a compositing application, but it’s approachable and quick for presentation-led work. The animated countdown clock guide for PowerPoint is also useful when the final destination is a deck rather than a website.
Procreate suits illustrators who want a hand-drawn dial, textured numerals, or expressive hands. The limitation is export. In many workflows, you’ll need a screen-recording workaround, then trim and convert the recording into a GIF. For general image animation methods, Zemith’s making photos move guide offers a helpful starting point.
Lottie is the better route for a web-embedded clock when you need scalable motion and richer control. LottieFiles can render an animation to GIF, although that conversion gives up some of the format’s advantages. SVGator, or a CSS animation captured from the browser, works well for designers comfortable with code and vector logic.
| Tool | Skill Level | Best For | Main Limitation |
|---|---|---|---|
| After Effects | Advanced | Precise hand animation and compositing | Requires a more involved export path |
| Keynote | Beginner to intermediate | Slide decks and simple illustrated clocks | Limited motion and palette control |
| Procreate | Intermediate | Hand-drawn dials and expressive illustration | Screen recording may be needed for export |
| Lottie | Intermediate to advanced | Web and app animation systems | GIF conversion can reduce efficiency |
| SVGator or CSS | Intermediate to advanced | Vector clocks and code-friendly workflows | Requires comfort with SVG or browser tools |
A beginner should choose Keynote for a static clock, or Procreate for an illustrated one. A professional should choose After Effects or Lottie when the asset needs to survive revisions. Use SVGator or CSS when the clock belongs inside a broader web animation system.
Designing the Hand Movement and Loop Seam
The loop should be designed before you draw the first keyframe. Choose a duration that divides cleanly into a minute so each second lands on a predictable frame boundary. 12-second, 20-second, and 60-second loops are dependable choices because they keep the timing relationship between the second hand and the dial easy to calculate.
For a loop shorter than one minute, the hour hand should normally remain at its selected hour position. It doesn’t need to snap to the 12 just because the animation restarts. For a full-minute loop, advance the minute or hour relationship according to the story the animation needs to tell. The important point is consistency. A hand that changes meaning at the seam will make the loop feel wrong even if the pixels match.
Build the movement around readable states
The second hand needs a little more care than a simple continuous rotation. Let it accelerate and decelerate around the 12 with a restrained ease curve. That easing softens the transition between the final frame and the first frame, particularly when the hand’s return would otherwise look like a sudden reset.
For the hour hand, place three or four intermediate keyframes between two positions when it needs to glide. A direct jump can work for a deliberately mechanical or vintage style, but it shouldn’t happen accidentally. The minute hand can move more slowly, while the second hand carries most of the perceived motion.
The flip clock screensaver guide is a useful contrast because flip clocks use discrete changes rather than sweeping hands. That difference matters. If your visual language is mechanical, embrace the step. If it suggests a traditional analog clock, don’t mix a teleporting hour hand with a silky second sweep.
Test the seam before rendering everything
Duplicate the first frame at the end of the timeline before export. Many encoders can compress that repeated state without creating visible ghosting, and it gives you a direct way to inspect the transition. Scrub from the penultimate frame to the duplicate and watch the center pin, hand tip, and nearby tick marks.
Avoid a continuous rotation effect that spins forever and gets cut at an arbitrary point. It technically loops, but the cut usually reveals itself as a hitch. A designed return path, or a carefully eased pass through 12, makes the loop feel intentional.
Export Settings That Keep File Size Honest
A clock GIF can look sharp in the editor and still exceed the delivery budget after export. Start with the canvas. A 200 × 200 to 400 × 400 pixel clock suits many feeds, widgets, and embedded panels. Going beyond 600 × 600 pixels often spends bytes on detail that smaller placements cannot show.
Set the export in this order: reduce resolution, control the palette, then adjust motion settings only when necessary. The animated GIF optimization guide explains why increasing frame count raises file size. For a clock GIF that must stay under 300 KB, remove unnecessary pixels before sacrificing a clean hand movement or an invisible loop seam.
| Setting | Recommended Range | Why It Matters | When to Push Higher | When to Pull Lower |
|---|---|---|---|---|
| Canvas | 200 × 200 to 400 × 400 px | Controls every frame’s pixel cost | Large presentation or display surface | Feed, widget, or email placement |
| Frame rate | 12 to 20 fps | Balances smooth hands with manageable bytes | Complex second-hand sweep | Stepping or slow-hand styles |
| Palette | 64 to 128 colors | Preserves key tones without bloating the file | Rich gradients or textured artwork | Flat dials and simple brand colors |
| Lossy compression | 80 to 120 | Removes detail viewers may not perceive | Simple, high-contrast artwork | Fine linework or soft gradients |
| Transparency | Only when needed | Prevents a matte box on changing backgrounds | Variable placement backgrounds | Fixed brand-color background |
| Dithering | Selective | Protects gradients while keeping flat areas clean | Photographic or textured elements | Flat dial faces and solid fills |
A posterize pass can limit the artwork to 64 or 128 unique colors. Apply dithering only where a gradient needs help. Full-image dithering scatters noise across the dial, weakens tick-mark clarity, and makes the second-hand path harder to read. Keep flat faces and solid brand colors flat.
Transparency belongs in the export only when the clock must sit over changing backgrounds. For a fixed background, matte the edges to its dominant brand color. Transparent GIF edges can show halos if anti-aliased pixels were prepared against a different background.
Check the entire loop in Photoshop’s timeline or GIMP’s animation tools, including the first-to-last transition. Inspect the center pin, hand tips, tick marks, and any gradient for flicker or a visible seam. Export a fallback WebP or APNG when the destination accepts richer formats. Keep the GIF as the compatibility asset, while the fallback can preserve smoother motion and better color handling.
Finding the Sweet Spot Between Frame Rate and Size
A clock can feel smooth in the editor and still miss a sub-300 KB target after export. Frame rate controls both perceived motion and the number of images the encoder stores. For a practical starting point, test 12 to 24 fps, then choose the lowest setting that keeps the hand movement readable. Frame-rate and GIF-size guidance covers the relationship between timing and file size, while the broader GIF frame-rate optimization guidance is already useful when reviewing export choices.
Extra frames do not automatically improve the design. GIF lacks modern inter-frame compression, so a higher frame rate usually stores more full-frame image data. Reduce the canvas or simplify the artwork before sacrificing timing. Keep the loop seam in view, too. A smaller file with a repeated hitch at the reset still looks unfinished.
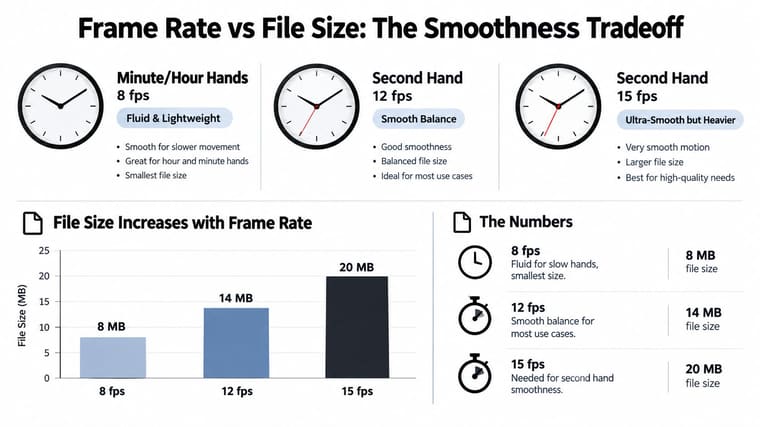
Slow minute and hour hands can remain fluid at a lower frame rate because their movement changes gradually. A second hand needs more temporal detail, especially when the design promises a continuous sweep instead of a stepped tick. Check the first-to-last transition at actual display size, not only in the timeline.
Use this starting rule:
- Start at 12 fps for a standard clock with minute and hour hands.
- Use 15 fps when a second hand needs a convincing sweep.
- Use 20 fps only when extra smoothness defines the design.
- Drop toward 8 fps for deliberately vintage, stepped motion.
Compare slow-hand movement with second-hand motion in this clock widget for a website context before committing to a heavier export. If the seam remains visible, fix the timing or endpoint before adding frames.
Accessibility and Motion Safety Essentials
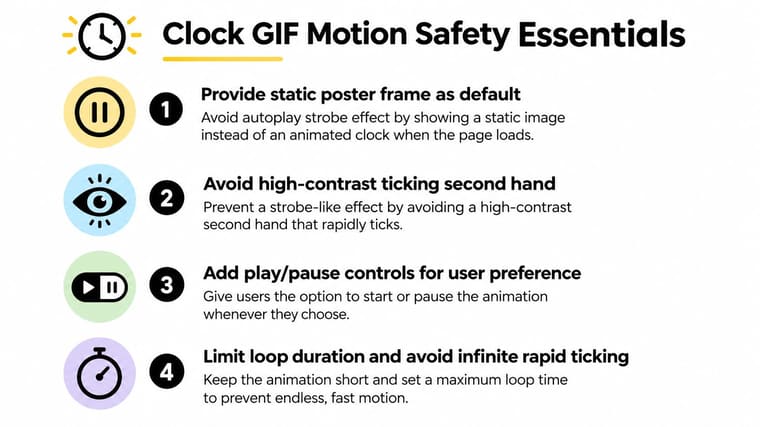
A clock GIF can look harmless to its creator and still create a poor experience for someone sensitive to motion. A rapidly moving second hand crosses high-contrast tick marks again and again, and an autoplaying loop gives the viewer no control. Accessibility guidance for animated images recommends that animation stop within 5 seconds, or provide a pause, stop, or hide control. It also advises avoiding flashing more than three times per second and supplying equivalent text, as explained in this accessible animated GIF guidance.
Start with a static poster frame. Make the first frame a usable still image rather than an empty setup frame, and pair it with descriptive alternative text such as “minimalist clock, minute hand at ten past, second hand sweeping.” The text should communicate the clock’s visual purpose, not merely label the file as an animation.
Reduce risk without flattening the design
If the animation runs continuously beyond 5 seconds, provide a reduced-motion alternative where the environment supports it. A prefers-reduced-motion rule can replace the GIF with a still PNG, while an embedded player can expose a visible play and pause control.
Check contrast in more than the intended brand presentation. The hands should remain distinguishable from the dial in grayscale, bright sunlight, and common color-vision conditions. A thin black hand on a dark blue face may look stylish in a studio preview but disappear on a real device.
Motion should communicate time, not demand attention every second.
Don’t rely on the moving hand to communicate a deadline or status. Add equivalent text beside the image, especially when the clock represents a countdown or an important time. If the destination can’t offer controls, consider using a still poster or a less active animation instead of forcing an infinite loop.
Quick Checklist and Smart Next Steps
Before exporting, run the clock through a short production check. The most common failures are visible before compression if you inspect the right things in the right order.
- Loop seam: Compare the final visible state with the first and confirm that the hand doesn’t jump or pause.
- Frame rate: Begin at 12 fps for standard hands, then move toward 15 fps for a smoother second-hand sweep.
- Palette: Reduce unnecessary colors while preserving the dial, hands, numerals, and any important gradient.
- Transparency: Use it only when the background changes, and check edge halos against the actual placement.
- Accessibility: Include a static poster frame, descriptive alt text, and a reduced-motion or pause option where the platform supports one.
- File review: Open the exported GIF in the actual destination, not only in your design application.
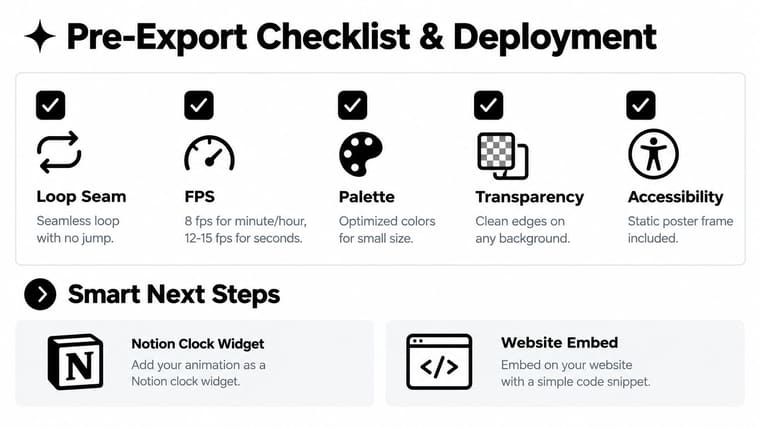
A finished clock can live in a slide deck, portfolio, website embed, or a Notion clock widget. Treat the portfolio version as a small motion case study: show the static dial, the timing logic, the loop test, and the final export rather than displaying only the polished result. That makes the invisible work, especially the seam, easier for another designer to evaluate.
Mobile home-screen clock widgets generally need a static PNG or a live wallpaper rather than a GIF. When the asset needs scalable motion or app-level control, convert the source to Lottie or WebM instead of forcing GIF beyond its useful role. Pretty Progress offers customizable countdown and progress widgets for devices including iPhone, iPad, Apple Watch, Mac, and Android, so it can serve a different use case when the goal is an always-visible deadline or progress reminder rather than an embedded animated image.
Archive the source file with its motion paths, keyframes, palette decisions, and export settings intact. A clock loop is only maintainable when someone can revise the timing without rebuilding the entire animation from a flattened GIF.
If you want to turn a finished clock concept into an always-visible countdown or progress reminder, explore Pretty Progress. Configure the dates and visual style, then use the widget on the device where you need the time or goal to stay in view.