

June 23, 2026
Your Home Renovation Timeline: A Practical 2026 Guide
Plan your project with a realistic home renovation timeline. This guide covers phases, dependencies, buffers, and how to track progress from start to finish.
You’ve probably already felt it. The contractor says the job will take a few months. The cabinet supplier wants decisions now. The permit office moves on its own clock. Meanwhile, you’re trying to answer a simple question: when will my house feel normal again?
That’s where most renovation stress starts. Not with demolition, dust, or invoices, but with a fuzzy timeline.
A good home renovation timeline isn’t just a date range on a proposal. It’s a living sequence of decisions, approvals, deliveries, inspections, and trade handoffs. If you understand that sequence, you stop reacting to delays and start managing them. That matters because a major home renovation usually runs in months, not weeks. A typical full remodel often takes 4 to 8 months, and projects with structural changes can stretch to 6 to 18 months or more, according to this home remodeling timeline breakdown.
Table of Contents
- The Anatomy of a Renovation Timeline
- Sequencing Your Project for Success
- How to Build a Realistic Contingency Buffer
- Sample Timelines for Common Projects
- Track Your Renovation with Pretty Progress
- Your Timeline Is Your Most Important Tool
The Anatomy of a Renovation Timeline
On paper, a renovation timeline looks clean. On site, it behaves more like a live sequence of handoffs, approvals, deliveries, and inspection windows. Homeowners usually feel blindsided when they expect steady daily progress and instead get bursts of activity followed by days that look quiet but still move the job forward.
That is normal.
A renovation schedule tracks more than labor. It tracks decision deadlines, permit review, material lead times, curing and drying time, access to the work area, and whether one trade left the space ready for the next one. If you want the timeline to feel manageable, stop treating it like a date range and start reading it like a chain of dependencies you can watch.
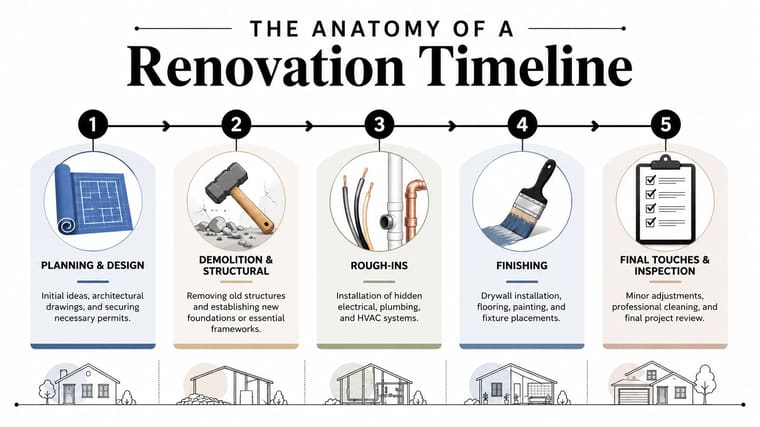
What each phase is really doing
Each phase has a job. If you know that job, you can tell whether the project is progressing or just looks busy.
- Planning and design. This phase sets the layout, scope, drawings, finish selections, and budget boundaries. If those decisions stay loose, the schedule stays loose too.
- Permits and approvals. Local review can move quickly or drag, and the contractor often has limited control once documents are submitted. A signed contract does not mean hammers start tomorrow.
- Demolition. Demo is fast, loud, and visible. It also exposes the surprises that reshape the rest of the timeline, such as old wiring, water damage, framing issues, or uneven floors.
- Structural work. Any change to walls, headers, beams, or floor framing has to be resolved before the project can close back up. This phase often controls the pace of everything behind it.
- Mechanical rough-ins. Plumbing, electrical, and HVAC go in before insulation and drywall. In kitchens, early decisions about appliance specs, drain locations, shutoffs, and vent routes prevent expensive reshuffling later. This guide to kitchen plumbing considerations is a useful example of how one trade decision affects cabinets, counters, and fixture placement.
- Insulation and drywall. This is the reset point where the project starts looking finished again, even though many of the highest-risk coordination items have only just been cleared.
- Interior finishes. Cabinets, tile, flooring, trim, paint, fixtures, hardware, and punch items compete for space here. This stage often appears close to done while still holding several dependencies.
- Final walkthrough and punch list. The work narrows to adjustments, corrections, missing items, and closeout details. Small does not mean instant.
One rule saves a lot of frustration: a phase is complete when the next trade can start cleanly, without opening finished work back up.
Why homeowners get surprised
The surprise usually comes from the gaps between visible milestones. A room can sit untouched for three days because the inspection has not happened yet, the tile is still in transit, or the electrician is waiting on the cabinet layout to be confirmed. That pause feels like delay. Sometimes it is. Sometimes it is the schedule doing exactly what the schedule requires.
Published remodeling ranges can help set expectations, but they are only a starting point. For example, one home remodeling timeline overview notes that homeowners should often allow a few months of planning time before the actual start date. On real jobs, that early window gets used up by selections, drawing revisions, permit review, and ordering items that take longer than expected.
The better question is not, “Why is nothing happening today?” Ask, “What is the next thing this phase is waiting on?”
A simple visual tracker helps here. A plain milestone board or project timeline visualization for home projects makes the waiting points visible, which is often the difference between feeling lost and knowing exactly what is holding the job up.
Use the timeline this way:
| Phase | What to monitor |
|---|---|
| Planning | Scope changes, selections, drawing signoff |
| Approvals | Permit status, comments, revisions |
| Open-wall work | Hidden conditions, rough-in completion, inspections |
| Finish stage | Product arrivals, trade access, measurement accuracy |
| Closeout | Corrections, missing parts, final adjustments |
Homeowners do better with a schedule when they can see the moving parts, not just the target finish date.
Sequencing Your Project for Success
The schedule doesn’t fail because people are lazy. It fails because tasks were listed without respecting dependencies.
A useful renovation plan works more like a chain than a checklist. One link slips, and the links after it move too.
Dependencies drive the schedule
A published step-by-step remodeling guide recommends building the schedule by scope first, then phasing work into design, permitting, demolition, structural work, rough-in MEP, finishes, and final punch list. It also notes ranges like 4 to 12 weeks for initial design, 4 to 10 weeks for permitting and material ordering, 2 to 6 weeks for demolition and structural work, 6 to 20 weeks for construction and installation, and 1 to 2 weeks for final walkthrough and closeout in this step-by-step renovation timeline.
That sounds obvious on paper, but the main lesson is this: every phase depends on the previous one being complete enough, not merely started.
Here’s what that looks like on site:
- Drywall can’t go up until plumbing, electrical, and HVAC rough-ins are done and cleared.
- Cabinets shouldn’t be scheduled loosely if appliance specs, plumbing points, or final measurements are still unresolved.
- Flooring placement depends on finish sequencing. In some projects, installers wait to protect finished surfaces. In others, the flooring sequence is adjusted around cabinetry or tile.
- Final paint and touch-up work belong late because other trades will nick walls.
The fastest jobs aren’t the ones with the most workers. They’re the ones where each worker arrives to a ready area.
Long-lead items deserve special attention. If cabinets, windows, specialty tile, or plumbing fixtures arrive late, the whole sequence can skid sideways. That’s why homeowners planning a kitchen often benefit from The Cabinet Coach’s kitchen remodeling advice, especially around locking layout and cabinetry choices before the field schedule gets tight.
What works on real job sites
The most reliable approach is a simple visual sequence, not a giant spreadsheet nobody updates. A clear milestone view helps you spot whether the job is moving in order. If you want a lightweight way to think about that structure, this guide to project timeline visualization shows how a visual timeline makes dependencies easier to understand at a glance.
A homeowner doesn’t need full project management software to ask smart sequencing questions. These usually tell you more than a polished Gantt chart:
- What must finish before demo starts
- What inspection has to pass before walls close
- Which materials are already ordered
- Which subcontractor is booked next
- What would most likely delay the next phase
If your contractor can answer those clearly, the schedule is probably real. If every answer is “we’ll figure it out,” the timeline is still theoretical.
How to Build a Realistic Contingency Buffer
Friday afternoon, the painter is booked for Monday, and then the tile crew opens a wall and finds plumbing that has to be rerouted. The finish date on paper has not changed, but the actual schedule just did.
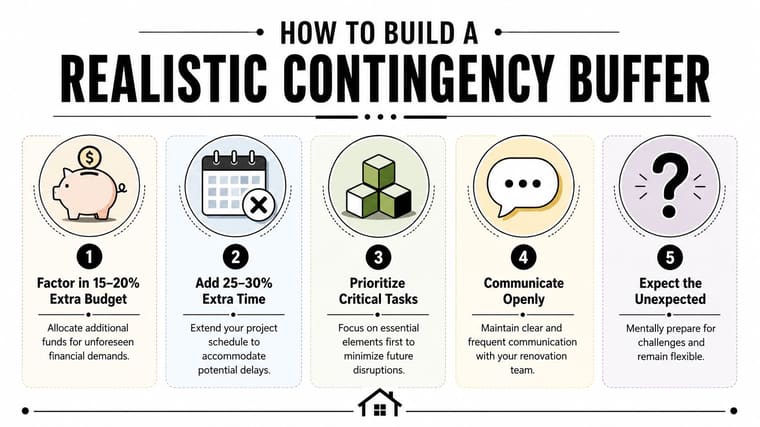
That is why a contingency buffer matters. It is not padding for the sake of padding. It is time reserved for the delays that show up once the job is opened up and the sequence starts shifting.
Why tight renovation schedules break down
A realistic schedule needs room for permit questions, late selections, subcontractor coordination problems, weather, and hidden conditions behind walls. Matterport’s home renovation checklist recommends building in a 10 to 15% time buffer for exactly those reasons.
On site, delays usually stack up in small pieces. One decision slips. One delivery misses its date. One inspection gets pushed. Then three trades have to be rescheduled because the area was not ready when expected.
That is the part homeowners often miss. The timeline is dynamic. A two-day delay in one phase can create a week of disruption if it bumps into inspector availability, supplier lead times, or a subcontractor’s next booked job.
A realistic timeline does not prevent surprises. It gives them a place to land.
How to build your personal buffer
Use three dates.
Keep the contract completion date. Track the working target the crew is trying to hit. Then set a personal date that protects your move-in, family plans, financing, or temporary housing. That third date is the one that keeps a normal project delay from turning into a personal emergency.
A practical buffer plan looks like this:
- Add contingency to the whole schedule. Older homes, custom products, structural work, and multi-trade bathrooms or kitchens usually need more room than a cosmetic refresh.
- Protect life events separately from construction milestones. If school starts, a rate lock expires, or family is coming to stay, give yourself space beyond the builder’s target date.
- Finish selections before the crew needs them. Tile, plumbing trim, lighting, appliances, and hardware can all stall progress if decisions are still open.
- Count working days realistically. Permit offices, inspectors, fabricators, and suppliers often run on business days, not your wall calendar. A business days calculator for renovation milestones helps you check whether the gap between steps is workable.
- Treat every change order as a schedule change first and a cost change second. Even a small product swap can affect ordering, installation sequence, and who has to come back later.
Bathroom projects are a good example because they look small but depend on tight handoffs between plumbing, waterproofing, tile, glass, and finish work. Homeowners comparing their own plan against a typical bathroom remodel schedule can usually see how little slack exists once one trade slips.
A simple tracking note is enough:
| Timeline layer | What it means |
|---|---|
| Contract date | The formal target from the builder |
| Working date | The date the team is trying to hit on site |
| Personal date | Your safer date for moving, hosting, or financing |
I tell homeowners to watch the gap between the working date and the personal date, not just the final promised finish. If that gap disappears, the project may still be recoverable, but your stress level will rise fast unless you reset expectations early.
Sample Timelines for Common Projects
A homeowner usually wants to know one thing after hearing all this: what does this look like in a real project?
The answer depends on scope. A powder room refresh, a gut kitchen, and a whole-house remodel don’t just differ in size. They differ in coordination. More rooms mean more trades, more decisions, and more handoffs. That’s one reason budget scale matters. In 2023, 51% of renovating homeowners spent $25,000 or more, up from 37% in 2020, and the median renovation spend reached $24,000, which was 60% higher than in 2020. At the high end, homeowners in the 90th percentile reported a median spend of $150,000 in this NAR remodeling overview. Bigger budgets often bring longer schedules because the work usually involves broader scope and tighter sequencing.
Sample Renovation Timelines by Project Scope
| Phase | Small Project (Bathroom) | Medium Project (Kitchen) | Large Project (Full Remodel) |
|---|---|---|---|
| Planning and design | Short and focused. Mostly layout, fixtures, and finish decisions. | More involved. Layout, appliances, cabinets, lighting, plumbing, and finish coordination. | Broad scope. Whole-home plans, room priorities, and systems coordination. |
| Permits and approvals | May be light or moderate depending on scope. | Commonly required for trade work and layout changes. | Usually substantial, especially with structural or multi-system work. |
| Demolition | Contained to one room. | Focused but disruptive because many systems meet in the kitchen. | Broad demolition with higher chance of hidden conditions. |
| Structural work | Sometimes none. Sometimes limited framing repair. | Possible if walls move or openings change. | Often significant if rooms are reconfigured. |
| Rough-ins | Plumbing and electrical concentrated in a small footprint. | Heavy MEP coordination. | Multi-room MEP sequencing across the house. |
| Drywall and prep | Fairly quick once inspections clear. | Moderate. Surface prep affects cabinet and tile quality. | Spread across zones and often staged. |
| Finishes | Tile, paint, trim, fixtures, glass, accessories. | Cabinets, counters, backsplash, flooring, appliances, final hookups. | Layered finish work across multiple rooms. |
| Punch list | Usually tight and manageable. | Often tied to appliance startup and final adjustments. | Can take time because small issues accumulate across many spaces. |
How to read these examples correctly
A small bathroom project usually feels simpler because the work is concentrated. But bathrooms are dense rooms. Plumbing, waterproofing, tile, electrical, and fixture fit all need to land cleanly in a tight area. If you want a room-specific benchmark, this bathroom remodel schedule is useful for comparing your contractor’s sequence against a typical bathroom flow.
A medium kitchen remodel often causes the most stress because the kitchen is both technical and central to daily life. Many projects stall here because cabinets, plumbing locations, appliance specs, and countertop templating depend on one another.
A large full remodel changes the nature of the schedule. At that point, the timeline isn’t just about construction speed. It’s about orchestration. Multiple crews need access to the right rooms at the right moment, and one unresolved decision can hold up several downstream tasks.
If your contractor gives the same style of timeline for a single bathroom and a structural full-house remodel, ask for a more detailed schedule. The coordination burden isn’t remotely the same.
Track Your Renovation with Pretty Progress
Most homeowners don’t need a full construction platform to stay informed. They need a simple way to see the project clock, the next milestone, and the deadlines that can still slip.
That’s where a visual tracker helps. Instead of opening a spreadsheet or searching old texts, you can keep the timeline visible all the time.

Set up the master timeline first
Start with one top-level project countdown. Use the planned completion date that the team is working toward, not your personal contingency date. That gives you a clear field target.
Then name it plainly. Good examples are:
- Full renovation complete
- Kitchen ready for use
- Move-back date
- Final inspection target
The value of a visual countdown isn’t just motivation. It forces clarity. If nobody wants to put a date on the timeline, that usually means the schedule still has unresolved scope or procurement issues.
For homeowners who want a cleaner way to monitor a long project, Pretty Progress can be used as a visual deadline tracker with countdowns and progress bars on devices you already check throughout the day.
Break the project into visible milestones
One master date isn’t enough. Renovations move better when you track milestone dates separately.
Create individual countdowns or progress markers for phases such as:
- Permit approval
- Demolition complete
- Rough-in inspection
- Drywall complete
- Cabinet install
- Countertop templating
- Final punch list
A home renovation timeline doesn’t fail all at once. It starts slipping one milestone at a time.
A useful setup is to keep only a few phase trackers visible at once. If you track everything, the system becomes noise. If you track the next major gates, it stays actionable.
Here’s a simple structure that works well:
| Tracker type | What to use it for |
|---|---|
| Master countdown | Overall project target |
| Current phase tracker | The job happening now |
| Next approval tracker | Permit or inspection date |
| Delivery reminder | Cabinets, fixtures, appliances, tile |
| Punch list tracker | Final closeout window |
Use reminders for pressure points
The biggest schedule problems usually happen before the field crew is blocked. A cabinet order is still pending. The faucet spec hasn’t been confirmed. The inspection hasn’t been booked. A visual tool helps most when it reminds you early enough to act.
Set reminders for the moments that commonly create downstream delays:
- Material confirmation a few days before ordering deadlines
- Inspection scheduling as soon as rough-in work starts wrapping up
- Walkthrough notes before each payment milestone
- Decision deadlines for tile, paint, hardware, lighting, and appliances
After you’ve mapped those milestones, it helps to see a working example of how a visual countdown layout can sit alongside your daily routine:
The point isn’t to turn a renovation into a productivity hobby. It’s to keep critical dates visible without needing a contractor login or a complicated app setup. For first-time homeowners, that simplicity matters. When the timeline lives on your screen, you’re more likely to catch drift early, ask the right question, and keep decisions moving.
Your Timeline Is Your Most Important Tool
A renovation doesn’t stay on track because someone wrote “12 weeks” on a contract. It stays on track because the work was phased properly, dependencies were respected, decisions were made on time, and delays had room to happen without wrecking the whole plan.
That’s what a strong home renovation timeline does. It breaks a stressful project into stages you can manage effectively. It shows you which task enables the next one. It gives you a buffer instead of a false promise. And it keeps the schedule visible enough that you notice problems while they’re still small.
You can’t control every variable. You can’t see inside every wall before demo. You can’t make permits, inspections, weather, and shipping behave exactly the way you want.
You can control how clearly the project is planned and how actively it’s tracked.
That alone changes the experience. Homeowners who understand the sequence of the work ask better questions, make faster decisions, and handle delays with less panic. The renovation still has rough days. It just doesn’t feel directionless.
If you want a simple way to keep your renovation dates visible without using heavy project software, Pretty Progress can help you track milestone countdowns and progress bars across your devices so the timeline stays in sight every day.